Dishwashers have become an essential kitchen appliance, saving us time and effort in the relentless battle against dirty dishes. However, when your trusty dishwasher starts to betray you by leaking all over the kitchen floor, it’s time to take action. In this comprehensive guide, we’ll walk you through the intricate process of fixing a leaky dishwasher, step by step. By the end of this journey, you’ll be a certified dishwasher whisperer.
Assess the Situation: Is It Really Leaking?
Before we grab our tools and plunge into the depths of dishwasher repair, let’s take a moment to ensure that the issue at hand is indeed a leak. Sometimes, it’s just a spilled glass of water or a misaligned dish causing all the fuss. To be certain, follow these steps:
- Dry Run: Empty your dishwasher completely and wipe the interior dry. If there’s any residual water, it might not be a leak but rather a drainage issue.
- Check Around: Examine the area beneath and around the dishwasher. Is there water pooling, or is it limited to a specific spot? Puddles might indicate a genuine leak.
Safety First: Unplug and Turn Off the Water
Safety should always be the first concern in any DIY project. Before you begin, follow these critical safety steps:
- Unplug the Dishwasher: Start by disconnecting the dishwasher from the electrical outlet. Even if the dishwasher is off, this extra precaution eliminates the risk of electrical mishaps.
- Turn Off the Water Supply: Locate the water supply valve connected to your dishwasher. Typically, it’s beneath the sink or behind the dishwasher. Give it a gentle clockwise twist to shut off the water flow.
Get Your Tools Ready
Now, let’s talk tools. The success of your mission depends on having the right equipment at your disposal. Here’s a list to help you prepare:
| Tools | What They’re For |
| Wrench | To disconnect the water supply line |
| Screwdriver | For removing the dishwasher panels |
| Towels | To soak up any standing water |
| Flashlight | For a better look inside |
| Replacement Parts | Just in case, if you find damaged components |
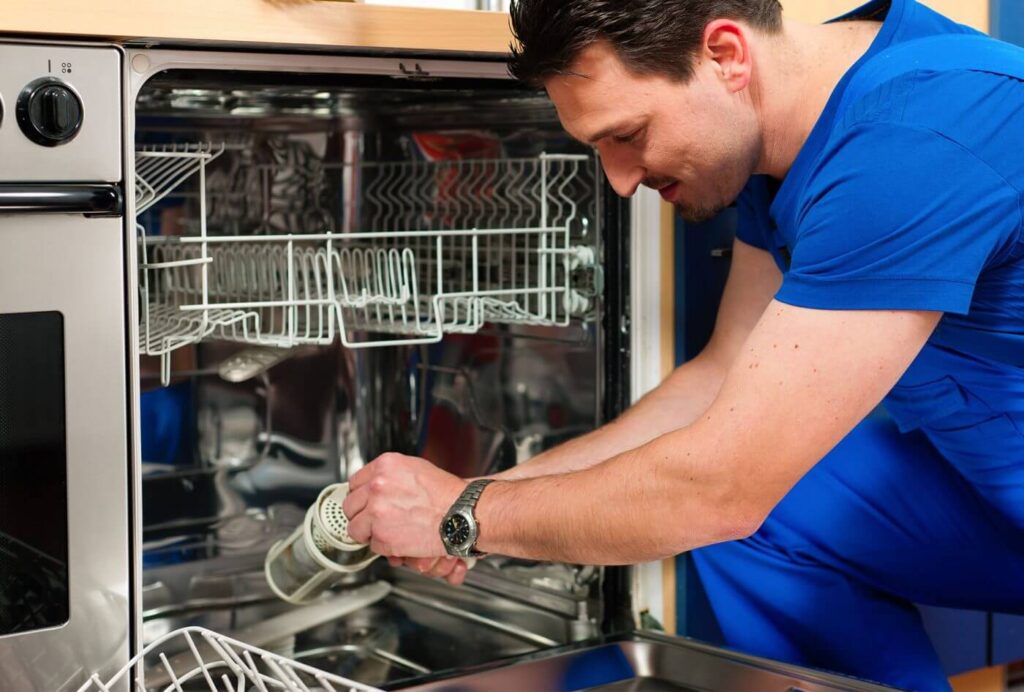
Take a Look Under the Hood
With safety measures in place and your tools at the ready, it’s time to unveil the beast—pull the dishwasher out from beneath the countertop and take a good look at its underside. This is where you might find critical clues about the source of the leak.
Locate the Culprit
Dishwashers, like people, can be mysterious when it comes to leaks. There are several usual suspects.
Door Gasket:
The door gasket, or seal, runs around the edges of the dishwasher door to keep water inside during cycles. If it’s compromised, it could lead to leaks.
What to do:
- Inspect the gasket for any visible signs of wear, such as cracks or tears.
- If damaged, you’ll need to replace it. Consult your dishwasher’s manual for the specific part or seek guidance from a professional.
Hose Connections:
Your dishwasher is connected to both water inlet and drain hoses. Loose or damaged hose connections can be a prime cause of leaks.
What to do:
- Examine the connections carefully. Hand-tighten any loose fittings.
- If you discover damage or wear, consider replacing the affected hose. Most hardware stores offer suitable replacements.
Pump and Motor Assembly:
The pump and motor assembly is the heart of your dishwasher, responsible for moving water in and out. Over time, these components can develop leaks, which may not always be easy to spot.
What to do:
- Carefully inspect the area around the pump and motor for any moisture or water droplets.
- If you suspect a leak here, you might need to consult your dishwasher’s manual or seek professional assistance.
Valves:
The inlet and outlet valves that control the water flow in and out of the dishwasher can also be culprits in the leaking game.
What to do:
- Ensure the valve connections are tight.
- If the valves themselves are leaking, it’s time to consider replacing them.
Fixing the Leak
Now that you’ve identified the source of the leak, it’s time to roll up your sleeves and get to work.
Fixing a Leaky Door Gasket
If the door gasket is the issue, here’s how you can address it:
- Inspect for Damage: Carefully examine the gasket for any visible damage, like cracks or tears.
- Clean It Up: If you see any debris or gunk on the gasket, give it a thorough cleaning to ensure a proper seal.
- Realign the Gasket: Sometimes, the gasket might just be misaligned. Ensure it’s properly seated in the channel.
If the gasket is beyond repair, it’s time for a replacement. You can find compatible gaskets at your local hardware store or order them online. Be sure to follow the manufacturer’s instructions for installation.
Hose Connections
- Tighten Loose Connections: Using your wrench, hand-tighten any loose hose connections. Ensure they are snug, but be careful not to over-tighten, as this can cause damage.
- Inspect for Damage: Examine the hoses for any signs of wear, such as cracks or fraying.
- Replace Damaged Hoses: If you find damaged hoses, it’s a good idea to replace them. Most hoses are relatively easy to swap out, making this a common DIY repair.
Pump and Motor Assembly
This part can be tricky, and you should only attempt this if you’re comfortable with dishwasher mechanics or have experience with appliance repair.
- Consult the Manual: Your dishwasher’s manual can be your best friend here. It provides detailed instructions on accessing and working on the pump and motor assembly.
- Check for Seals: Inspect the seals and connections in this area for signs of damage or wear.
- Call a Professional: If you’re uncertain about this repair, or if the damage is extensive, it’s wise to call in a professional appliance technician. Attempting complex repairs without the right skills can lead to further issues.
Valves
- Tighten Valve Connections: As with hose connections, ensure the valve connections are securely fastened. A wrench may be needed for this.
- Replace Faulty Valves: If the valves themselves are leaking or damaged, it’s time for replacements. Follow the manufacturer’s recommendations for purchasing and installing new valves.
Reassemble and Test
With the repairs complete, it’s time to put everything back in place. Follow these steps:
- Reattach Panels: Carefully reattach any panels or covers that you removed earlier. Use the screwdriver to secure them in place.
- Plug It In: Reconnect the dishwasher to the electrical outlet.
- Turn On the Water: Open the water supply valve to allow water to flow back into the dishwasher.
- Run a Test Cycle: Now, run a short test cycle to ensure that the leak is resolved. Keep a close eye on the dishwasher during this process, checking for any signs of new leaks or issues.
Celebrate Your Victory!
If you’ve followed these steps and your dishwasher is no longer leaking, congratulations! You’ve successfully defeated that troublesome leak and brought your dishwasher back to life. Now, you can load it up with dirty dishes and let it work its magic, all without the fear of a watery disaster.
When to Seek Professional Help
While many dishwasher leaks can be resolved through DIY efforts, there are situations where it’s best to call in a professional:
- Complex Repairs: If you’re not confident in your ability to tackle intricate repairs involving the pump and motor assembly, it’s wise to seek expert assistance.
- Repeated Leaks: If you’ve attempted to fix the same issue multiple times, it may be a sign of a more significant underlying problem.
- Under Warranty: If your dishwasher is still under warranty, any repairs should be handled by authorized service providers to avoid voiding the warranty.
- Safety Concerns: If you ever feel that your safety is at risk during the repair process, immediately stop and call a professional.
Final Words
Leaky dishwashers can be a real headache, but armed with the right tools and knowledge, you can often tackle the issue yourself. Remember to stay safe, double-check your work, and don’t hesitate to seek professional help if needed. A dry kitchen floor and spotlessly clean dishes are just around the corner, and you’re well on your way to becoming a dishwasher repair expert. Happy dishwashing!
Additional Tips for Dishwasher Maintenance
While you’re in the DIY spirit, why not extend the life of your dishwasher with a little extra care? Here are some bonus tips to keep your dishwasher running smoothly:
1. Regular Cleaning:
- Clean the dishwasher’s filter regularly. A clogged filter can affect the drainage and lead to unpleasant odors.
- Run an empty dishwasher with a cup of vinegar or a dishwasher cleaner to remove built-up grime and mineral deposits.
2. Scrape, Don’t Rinse:
- Scrape off excess food from your dishes instead of pre-rinsing them. Modern dishwashers are designed to handle food particles.
3. Use the Right Detergent:
- Make sure you’re using the right dishwasher detergent for your machine. Different types of detergents work best with specific dishwashers.
4. Load Wisely:
- Avoid overloading the dishwasher, as it can reduce the effectiveness of the wash cycle.
- Place dishes strategically to ensure water can reach all items for thorough cleaning.
5. Regular Maintenance Checks:
- Periodically inspect hoses and connections for signs of wear or leaks, even when your dishwasher isn’t leaking. Preventive maintenance can save you from sudden surprises.
By following these additional tips, you can extend the life of your dishwasher and reduce the likelihood of future leaks or breakdowns. Your dishwasher will be your reliable kitchen sidekick for years to come!
Dishwasher Leak Repair FAQ
Got questions about fixing that pesky dishwasher leak? You’re in the right place! Check out these frequently asked questions and find the answers you need to tackle your dishwasher repair with confidence.
1. How do I know if my dishwasher is leaking or if it’s just water from dishes?
Sometimes it can be hard to tell. To confirm a leak, empty the dishwasher, dry it thoroughly, and then run a short cycle. If water pools underneath or you find new puddles, it’s likely a leak.
2. Is it safe to unplug the dishwasher while it’s still wet inside?
Yes, it’s safe to unplug your dishwasher even if there’s water inside. Just ensure you’ve disconnected it from the power source before doing any repair work. Safety first!
3. Can I use a regular wrench to disconnect the water supply line?
Yes, a regular adjustable wrench is usually sufficient for disconnecting the water supply line from your dishwasher. Make sure you turn off the water supply before using the wrench.
4. How can I find the right replacement parts for my dishwasher?
To find the right replacement parts, refer to your dishwasher’s model and serial number. You can usually locate this information on the inside of the door or the side of the dishwasher. Once you have these details, you can order the correct parts from appliance stores or online retailers.
5. What should I do if I can’t find the exact replacement part for my dishwasher?
If you can’t find the exact replacement part, you may be able to use a universal part or seek guidance from a professional appliance technician. They often have access to a wider range of parts and may be able to adapt a compatible replacement.
6. Can I repair the dishwasher pump and motor assembly myself?
Repairing the pump and motor assembly can be complex, and it’s recommended only if you have experience or are comfortable working with dishwasher mechanics. If you’re unsure, it’s best to consult the dishwasher’s manual or call in a professional.
7. Are there any preventive measures to avoid dishwasher leaks?
Yes! Regular maintenance can help prevent leaks. Clean the dishwasher filter, run maintenance cycles with vinegar or dishwasher cleaner, scrape off excess food from dishes instead of rinsing, and avoid overloading your dishwasher.
8. How often should I check for leaks or perform maintenance on my dishwasher?
Regular checks and maintenance can be done on a monthly or quarterly basis, depending on your usage and water quality. However, if you suspect an issue, don’t hesitate to inspect your dishwasher right away.
9. What’s the main difference between a dishwasher valve and a dishwasher inlet valve?
A dishwasher valve typically refers to the inlet and outlet valves. The inlet valve controls the flow of water into the dishwasher, while the outlet valve is responsible for draining water from the dishwasher. Leaks in either of these valves can cause problems.
10. What should I do if the issue persists after attempting DIY repairs? If the problem continues after your DIY repairs or if you’re uncomfortable with the repair process, it’s time to call a professional appliance technician. Repeated leaks can be a sign of a more significant underlying issue that requires expert attention.