Ah, the wonders of modern appliances! Where would we be without them, especially our trusty dryers? But, like all good things in life, sometimes they hit a snag. And guess what? One of the most common culprits behind a dryer not working efficiently is – drum roll, please – its heating element! Let’s delve into this sizzling topic and heat up your knowledge, especially if you’re hailing from Brooklyn, New York, where swift laundry is almost a way of life!
Why Is the Heating Element So Crucial?
Now, you might be thinking, “Why all the fuss about this ‘heating element’?” Well, imagine trying to fry an egg without heat; that’s what a dryer would be without its heating element – pretty useless, huh? This little guy is the heart and soul of your dryer. It’s the very thing that turns that wet heap of clothes into a fluffy, warm, and snuggly pile.
What’s the Deal with a Malfunctioning Heating Element?
Ever had those moments when you’re running late, and for the love of all things fluffy, your dryer decides to take its sweet time? Or worse yet, it feels like it’s on a cold winter vacation in the middle of Brooklyn, New York’s summer? Yeah, been there, done that. Often, a mischievous heating element is to blame.
- Telltale Signs to Watch Out For:
- The never-ending spin: Your clothes are tumbling for ages but still come out damp.
- It’s cold in here!: Open the dryer, and it feels like Antarctica.
- Physical blemishes: Yep, just like us, heating elements age too. Look out for visible damages or broken coils.
- A Thing or Two About Lifespan:
- The good news? Most heating elements have got your back for several years.
- The not-so-good news? Like all heroes, sometimes they wear out and need a little TLC or replacement.
So, if you’re scratching your head, wondering why your Brooklyn apartment’s laundry isn’t drying as it should, take a moment. Could be that your dryer’s heating element is silently pleading for some attention. And trust me, a happy heating element equals happy laundry days!
Understanding the Dryer Heating Element
Diving deeper into the world of drying machines, let’s get up close and personal with the real star of the show: the dryer heating element. Ever heard the saying, “It’s what’s on the inside that counts”? Well, when it comes to dryers, that couldn’t be more accurate.
The Anatomy of the Heating Element
Before we get ahead of ourselves, let’s break down what this piece of tech wizardry really is. In layman’s terms, the heating element is like the heart of a dragon, breathing fire (or, in this case, heat) into your dryer:
- The Core Material: Typically, the heating element is fashioned out of a resilient alloy called nichrome. This nifty combination of nickel and chromium isn’t just chosen willy-nilly; it’s known for its fantastic resistance properties. When electricity zips through it, this resistance leads to, you guessed it, heat!
- The Big Heat: This isn’t just a lukewarm kind of heat. We’re talking about a temperature high enough to vaporize those pesky water droplets clinging to your clothes.
The Different Heating Element Personalities
Yes, you read that right! Our trusty heating elements come in various styles and configurations. A one-size-fits-all approach? Not in this arena:
- Open Coil Elements: These are the extroverts of the heating element world. They’re visible, exposed, and get straight to the point.
- Enclosed Coil Elements: A tad more introverted, these guys prefer staying sheltered inside ceramic enclosures. It’s like a protective bubble that ensures even heating and a longer life.
- Ribbon Heating Elements: The trendsetters! They boast a flat, broad structure. Think of them as the “wide-brim hats” of heating elements.
How Long Do They Hang Around?
Everything has an expiry date, and unfortunately, that includes our beloved heating elements. But don’t start shedding tears just yet:
- Average Lifespan: While they’re quite the troopers, typically serving you faithfully for several years, a lot hinges on factors like usage intensity, the dryer’s brand, and maintenance. Remember, a little TLC goes a long way!
And there you have it! A sneak peek into the fiery heart of your dryer. Next time you’re snuggling into a warm blanket straight out of the dryer, spare a thought for the unsung hero: the heating element. Hats off to you, little guy!
Steps to Replace a Dryer Heating Element
Ahoy, brave DIY enthusiast! Feeling the itch to roll up your sleeves and dive headfirst into the world of dryer repairs? Well, kudos to you! But hold your horses; while enthusiasm is half the battle, the other half is, well, knowing what the heck you’re doing. Fear not, for we’ve got a roadmap ready for you.
Safety First, Always!
Before we embark on this electrifying journey, let’s make sure we’ve got our bases covered. Remember the saying, “Better safe than sorry”? It’s old but gold:
- Unplug that Beast: First things first – ensure the dryer is unplugged from its power source. We’re aiming for a fix, not a shock!
- Dress the Part: It might not be a fashion statement, but safety gloves and eye protection are a must. Let’s keep those fingers and peepers safe, shall we?
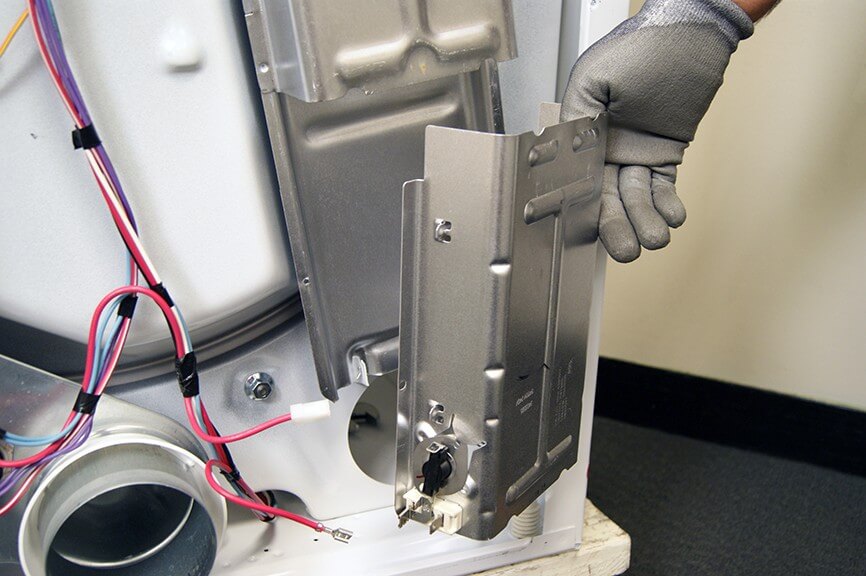
Getting to the Heart of the Matter
Like a surgeon prepping for an operation, you’ll need to access the patient’s – I mean, dryer’s – core:
- Expose the Innards: Depending on your dryer’s model, this might mean removing the back or front panel. Keep those screws safe; you’ll need them later!
- Spot the Star: The heating element typically resides in a cozy metal casing. It should be pretty recognizable, but if in doubt, your dryer’s manual should have a handy diagram.
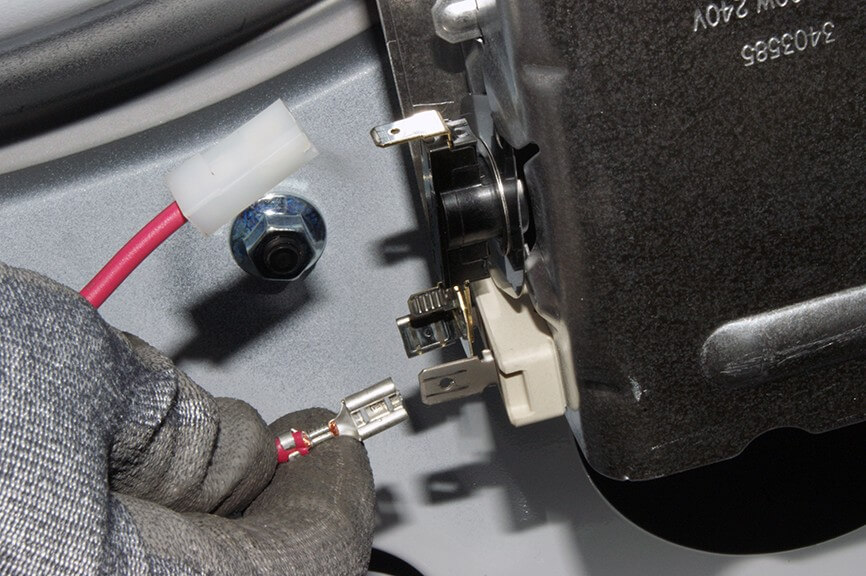
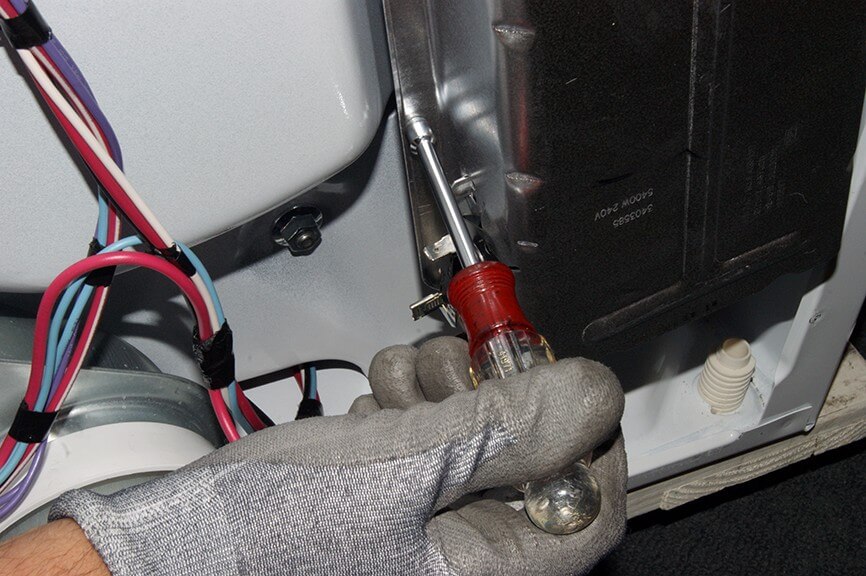
Out with the Old, In with the New
Now, here’s where the rubber meets the road:
- Disconnect with Care: Before yanking out the old element, disconnect any wires attached to its terminals. A gentle touch works wonders!
- Release the Kraken: Or, in less dramatic terms, remove the screws or clips holding the element in place.
- Slide and Replace: Carefully extract the old heating element and slide in its shiny new replacement.
Firing it Up!
Time to see if your handiwork has paid off:
- Reconnect and Secure: Make sure to attach any wires back to the heating element’s terminals and secure it using screws or clips.
- Close Shop: Reattach the dryer’s panel and ensure everything’s snug and tight.
- Power On and Test: Plug that bad boy in and run a short cycle. Fingers crossed, you should feel the warmth embracing your clothes once more.
Mistakes to Sidestep
As with any DIY adventure, there are pitfalls to watch out for:
- Mismatched Elements: Always ensure your replacement is compatible with your dryer model. It’s like finding the right puzzle piece!
- Loose Connections: A hastily reconnected wire can lead to inefficiency or even hazards. Double-check your work.
There you have it, brave soul! A step-by-step guide to replacing a dryer’s heating element. May your clothes forever be warm and toasty. Onward to the next DIY challenge!
Common Mistakes to Avoid
Well, my DIY-spirited friend, you’ve come a long way! But before you gallantly stride ahead, armed with tools and confidence, let’s take a pit stop. Here’s a nifty list of common blunders folks often stumble upon when it comes to dryer heating element replacements. A stitch in time saves nine, right:
1. The Power Oversight:
- What’s the snafu? Diving right into the repair without unplugging the dryer.
- Why it’s a no-no: It’s like playing tag with electricity, and trust me, you don’t want to be “it.” Safety should never take a back seat.
2. The Mismatched Element Tango:
- What’s the blunder? Grabbing any heating element that looks “kinda right” and trying to make it fit.
- The fallout? It’s like forcing a square peg into a round hole. Even if it seems to fit, your dryer might not heat up efficiently, or worse, it could damage the appliance.
3. Ignoring the Wiring Waltz:
- The oversight? Not properly connecting the wires or forgetting them altogether.
- The potential hiccup? Loose wires can lead to inefficient heating, or even turn your dryer into a fire hazard. Always double, or even triple-check your connections.
4. The “I Don’t Need No Manual” Mindset:
- The misstep? Charging ahead without glancing at the dryer’s manual.
- Why that’s tricky: Even if you’ve replaced a heating element before, not all dryers are created equal. A quick look at the manual can save you heaps of time and frustration.
5. Overlooking the Sidekicks:
- The slip-up? Focusing solely on the heating element and not inspecting other parts like thermostats and fuses.
- The drawback? It’s like treating a cough but ignoring the cold. Sometimes, other parts might also need some TLC or replacement.
6. The Hasty Wrap-Up:
- The goof? Rushing to reassemble everything without ensuring all parts are properly aligned and screws are tightened.
- The aftermath? A rickety dryer that might need another repair sooner than you’d like.
7. Skipping the Test Run:
- The oversight? After the replacement, immediately using the dryer for a full load without a test cycle.
- Why it’s a folly? A test run can help spot any issues before they become bigger problems. Always better to catch a glitch early!
In a nutshell, while it’s commendable to take the DIY route, a little caution and preparation go a long way. Avoid these pitfalls, and you’ll be on the fast track to becoming the neighborhood’s go-to dryer guru. Rock on!
To Sum It Up…
Whether it’s the satisfaction of a job well done, the joy of fluffy warm towels on a cold morning, or simply the thrill of mastering a new skill, understanding and tackling dryer issues is an adventure worth embarking upon. Just remember, every appliance, no matter how complex, has its own rhythm and rhyme. Listen, learn, and leap into action.
Cheers to many more warm, snuggly clothes and to all the DIY challenges that lie ahead. Here’s to you, the unsung hero of laundry day!
Frequently Asked Questions (FAQ)
Q: How can I tell if my dryer heating element is faulty?
A: A clear sign is when your clothes just aren’t getting dry even after a full cycle. Another indicator? If the dryer runs, but doesn’t produce any heat. For the tech-savvy, you can also use a multimeter to test the element for continuity.
Q: How often should I replace my dryer’s heating element?
A: Typically, a heating element can last several years. However, its lifespan depends on factors like usage frequency, maintenance, and the dryer’s brand. If you notice a dip in performance, it might be time to check it out.
Q: Can I use any heating element for my dryer?
A: Nope! It’s crucial to find a replacement that’s compatible with your dryer model. Using mismatched elements can lead to inefficient heating or potential damage.
Q: Is it safe to DIY the heating element replacement?
A: With the right tools, a trusty guide (like the one you just read!), and proper safety precautions, many folks find success with DIY replacements. But if you’re ever in doubt, it’s wise to consult with or hire a professional.
Q: Are there other parts I should inspect when replacing the heating element?
A: Absolutely! It’s a good idea to check related components like thermostats, fuses, and wiring when you’re doing a replacement. Sometimes, these parts might also be due for some TLC or replacement.
Q: How much does a new heating element cost?
A: The cost can vary based on the brand and model of your dryer. On average, you might spend anywhere from $30 to $100, but always ensure you’re getting a genuine and compatible part for your appliance.
Q: If I’m not comfortable with a DIY fix, how much would a professional repair cost?
A: Professional repairs, including the part and labor, can range from $150 to $400, depending on the complexity, the technician’s rates, and your location.
Q: What’s the average lifespan of a dryer?
A: With proper maintenance and care, a typical dryer can serve you well for about 10-13 years. Regular checks and timely replacements can ensure you get the most out of your appliance.